Physical therapists commonly recommend six core exercises to stabilize the sacroiliac joint: the bird dog exercise, hip adduction with a resistance ball, side planks from the knees, quadruped core movements, and related stabilization techniques. These exercises work by strengthening the muscles surrounding the SI joint—including the lower back, abdominals, buttocks, hips, and hamstrings—to improve stability and reduce pain. For example, a patient experiencing SI joint discomfort during sitting might notice improvement within two to three weeks of consistent bird dog and hip adduction work. This article details each recommended exercise, explains the underlying mechanism of how they reduce pain, and provides guidance on implementing them safely and effectively.
Table of Contents
- What Six Specific Exercises Do Physical Therapists Recommend for Sacroiliac Joint Stabilization?
- How Core Stabilization Exercises Address the Root Cause of SI Joint Pain
- The Bird Dog Exercise as a Foundation for SI Joint Stability
- Building a Progressive SI Joint Exercise Program From Beginner to Advanced
- Common Mistakes That Limit Progress With SI Joint Stabilization Exercises
- When to Add Advanced SI Joint Stabilization Techniques
- Long-Term SI Joint Management and Prevention of Future Dysfunction
- Conclusion
What Six Specific Exercises Do Physical Therapists Recommend for Sacroiliac Joint Stabilization?
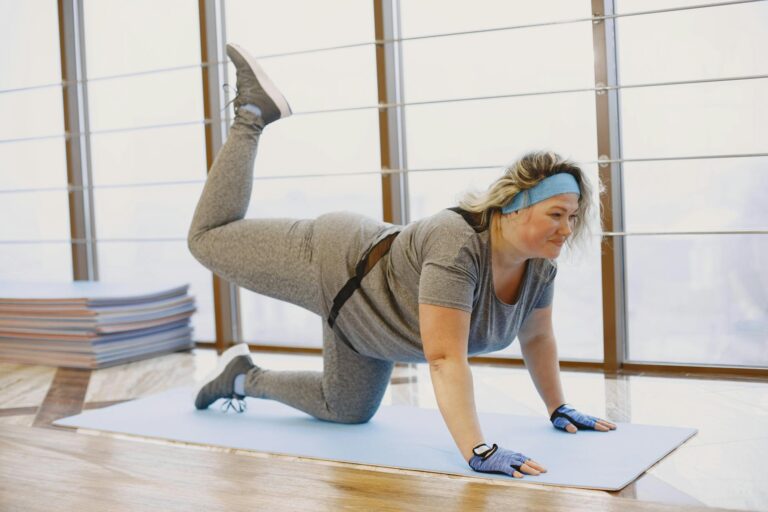
The foundation of SI joint rehabilitation starts with the bird dog exercise, performed on all fours by simultaneously extending your opposite arm and leg while maintaining a neutral spine position. This movement directly targets the lower back and abdominal muscles, creating the core stability needed to support the SI joint during daily activities. The second primary exercise is hip adduction, performed by lying on your back with knees bent and squeezing a medium rubber exercise ball between your knees for 5-second holds, repeated for 10 repetitions per set.
This targets the hip adductors and lower abdominal muscles, which play a critical role in controlling pelvic movement and preventing SI joint dysfunction. The side plank from the knees represents the third recommended exercise, engaging the oblique muscles and deeper core stabilizers that support lateral stability of the pelvis. Physical therapists also emphasize quadruped core movements—performed on hands and knees with active abdominal engagement—where you raise one arm straight out in front while maintaining stability through your core. These foundational four movements form the core of most SI joint rehabilitation programs, though individual physical therapists may modify or add variations based on your specific presentation and pain patterns.

How Core Stabilization Exercises Address the Root Cause of SI Joint Pain
The mechanism behind these exercises is straightforward: SI joint pain typically results from insufficient stability and muscular control around the pelvis and lower spine. When muscles in the lower back, abdomen, pelvis, and thigh weaken—whether from sedentary work, injury, or biomechanical dysfunction—the SI joint must absorb more force and stress than it was designed to handle. Strengthening these muscle groups redistributes the load, reducing the mechanical stress on the SI joint itself and improving both spinal stability and overall lower back function. Research shows that targeted strengthening exercises can significantly reduce SI joint pain and improve the ability to perform normal daily activities without discomfort.
However, it’s important to understand that SI joint pain is not a one-size-fits-all condition. Some individuals experience pain from joint hypermobility (excessive movement), while others suffer from hypomobility (restricted movement). While strengthening and stabilization exercises help the majority of hypermobility cases, someone with a partially fused or genuinely immobile SI joint may need different intervention approaches. This distinction is why working with a qualified physical therapist is crucial before starting any exercise program—they can assess your specific joint mechanics and recommend the appropriate exercises for your condition rather than guessing based on generic advice.
The Bird Dog Exercise as a Foundation for SI Joint Stability
The bird dog exercise deserves special attention because it’s the most commonly recommended starting point for SI joint rehabilitation. To perform it correctly, start on all fours with your shoulders directly over your wrists and hips directly over your knees, then extend your right arm straight ahead while simultaneously extending your left leg straight behind you, holding for 2-3 seconds before returning to the starting position. Repeat for 10-15 repetitions, then switch sides.
The key is maintaining a neutral spine throughout—your back should not sag or arch excessively, and your pelvis should stay level without rotating toward either side. Many people initially struggle with the bird dog because they either extend the opposite limbs too aggressively (creating momentum that removes the stabilization benefit) or lose core engagement and allow their back to sag. A practical modification involves performing the movement without full limb extension—lifting the arm and leg just a few inches off the ground—until you develop enough core strength to maintain perfect form through full range of motion. The bird dog is particularly effective because it addresses the fundamental coordination problem underlying many SI joint issues: the inability to move a limb while maintaining stable core control, which translates directly to improved stability during walking, sitting, and bending.

Building a Progressive SI Joint Exercise Program From Beginner to Advanced
Starting your SI joint stabilization program requires a structured approach that respects your current fitness level and pain tolerance. Most physical therapists recommend beginning with two or three sessions per week of basic exercises like the bird dog and hip adduction, performing 10-15 repetitions of each for 2-3 sets, with rest days between sessions to allow muscle adaptation. This moderate frequency prevents overtraining while building strength consistently; too much too soon often triggers a pain flare that discourages continued exercise.
After 2-4 weeks of consistent basic work, you can progress by increasing repetitions, adding resistance (such as ankle weights for bird dogs), or introducing slightly more challenging variations. The comparison between daily light exercise versus less-frequent intense workouts is important here: for SI joint stabilization, consistency and proper form matter far more than volume. Three 20-minute sessions of focused, controlled movements will produce better results than daily sessions performed with poor form while fatigued. Many people also benefit from combining these strengthening exercises with proprioceptive training—exercises that improve your body’s awareness of its position in space—such as standing on one leg while engaging your core, which translates stabilization improvements to functional, everyday movement patterns.
Common Mistakes That Limit Progress With SI Joint Stabilization Exercises
The most frequent error therapists observe is performing exercises while the SI joint is actively inflamed or while pain levels are high. While gentle movement can be appropriate, attempting full bird dog exercises during an acute pain flare often worsens symptoms and creates a discouraging feedback loop that leads people to abandon their program. A practical guideline: if an exercise causes sharp pain (as opposed to muscle fatigue), stop that movement and either modify it, reduce range of motion, or return to an easier variation. Mild discomfort from muscle activation is normal and expected; sharp, shooting pain is a warning signal that something is wrong.
Another critical limitation involves compensation patterns—when your brain and body find ways to cheat through proper movements. For instance, someone performing hip adduction might use momentum or allow their pelvis to rotate rather than maintaining neutral spine alignment, which defeats the purpose of the exercise and sometimes irritates the joint further. This is why video recording yourself or working with a physical therapist for feedback is valuable, at least in the early stages of your program. Additionally, the expectation that exercises should provide immediate pain relief often leads to premature progression. SI joint stabilization is typically a 6-12 week process, and expecting pain elimination within days sets unrealistic expectations that undermine program adherence.

When to Add Advanced SI Joint Stabilization Techniques
After establishing baseline strength with foundational exercises over 4-6 weeks, physical therapists often introduce more dynamic movements that challenge stability during functional activities. This might include single-leg stance exercises, walking lunges with proper core engagement, or modified squats performed with careful attention to pelvic control. These progressions matter because they bridge the gap between isolated muscle strengthening and the real-world ability to perform everyday activities—bending, walking, sitting down and standing up—without pain.
An example of this progression: once you can perform 15 perfect bird dogs on each side, you might progress to a plank hold, which requires sustained core activation rather than repetitive movement. Advanced techniques sometimes include SI joint-specific mobility work or proprioceptive retraining, though these should always be introduced by a qualified physical therapist familiar with your individual condition. Some individuals benefit from wearing an SI joint belt during exercise or daily activities in the early recovery phase, which provides external stabilization while internal muscles strengthen—a temporary support that should be gradually reduced as strength improves.
Long-Term SI Joint Management and Prevention of Future Dysfunction
The exercises recommended for SI joint stabilization aren’t temporary interventions; they represent the foundation of long-term joint health and pain prevention. Many people who successfully resolve SI joint pain through strengthening continue maintaining their core and stabilization exercises indefinitely—not necessarily at the same intensity, but as part of their regular fitness routine. Think of it similarly to dental hygiene: you don’t just brush your teeth when you have a cavity and then stop; you maintain the habit because prevention is more effective than repeated treatment.
Forward-looking management also involves identifying and addressing biomechanical factors that contributed to SI joint dysfunction in the first place. This might include improving posture, adjusting your work ergonomics, modifying running or walking mechanics, or changing how you perform heavy lifting. A person whose SI joint pain was triggered by years of poor desk posture can resolve their immediate symptoms through exercise, but without addressing the underlying postural habit, pain may recur. This comprehensive approach—combining exercise with lifestyle modification and ongoing awareness—provides the best protection against SI joint problems becoming a chronic, recurring issue throughout your life.
Conclusion
Physical therapists recommend six primary exercises for sacroiliac joint stabilization: bird dog movements, hip adduction with a resistance ball, side planks from the knees, quadruped core strengthening, and related core engagement techniques. These exercises reduce SI joint pain by strengthening the surrounding muscles—the lower back, abdomen, buttocks, hips, and hamstrings—which improves pelvic stability and reduces mechanical stress on the joint itself. The exercises are most effective when performed consistently over 6-12 weeks, with attention to proper form rather than high volume or intensity.
If you’re experiencing sacroiliac joint pain, the appropriate next step is consultation with a qualified physical therapist who can assess your specific condition and tailor an exercise program to your needs. While these six exercises work for many people, your individual situation may require modifications or additional interventions. A physical therapist can guide you through progression, ensure you’re performing movements correctly, and help you transition from rehabilitative exercise to long-term maintenance and prevention strategies.